
You are using an out of date browser. It may not display this or other websites correctly.
You should upgrade or use an alternative browser.
You should upgrade or use an alternative browser.
The Montana Porch Painter
- Thread starter Rick Otts
- Start date


EdCaffreyMS
"The Montana Bladesmith"
GRRRRRRR!  There ain't enough money on the planet to get me to hire out painting! Wish I was rich enough to hire all this stuff out.
I spent the WHOLE day today..... more than 1/2 of it masking/taping. I'd almost rather get poked in the eye with a sharp stick!
I did get the first coat of "DeckOver" down.....but it's gona require another. All I can say is COME ON WINTER! That way I can get away from all these summertime chores, and back into the shop!
Seems like all I do in the summer.....is get things ready for the winter...... then repeat, repeat, repeat...........
There ain't enough money on the planet to get me to hire out painting! Wish I was rich enough to hire all this stuff out. I spent the WHOLE day today..... more than 1/2 of it masking/taping. I'd almost rather get poked in the eye with a sharp stick!
I did get the first coat of "DeckOver" down.....but it's gona require another. All I can say is COME ON WINTER! That way I can get away from all these summertime chores, and back into the shop!
Seems like all I do in the summer.....is get things ready for the winter...... then repeat, repeat, repeat...........

Von Gruff
KNIFE MAKER
Me to. I have had the kitchen, and hall and a couple of bedrooms I have the que for painting for about 20years now and my wife is coming to understand that it is not on my radar any time soon. Always have something else you just have to do is my strategy. I will eventually have to pay someone else to do it for me.
springer82
Well-Known Member
Does he travel??

C Craft
Well-Known Member
Ed, I worked for a small contractor. When I hired in with him they were in the middle of a large remodel job. I showed him I knew what I was doing. He told me when I hired on it might just be for this one job but I needed the work. So I guess he was trying to decide if he was gonna keep me on!
He told me that the next job required a lot of painting along with the remodel. So he looks at me and asks, "can you paint". I told him, well it was my favorite thing to do. He looks at me and his big booming and sometimes intimidating voice and says, "I didn't ask you your damn religion about it, can you paint"??? While sure I can. That is one of the few things I can do left handed. I can use a paint brush for cutting in work and I can run a skill saw left handed. However I would just about as soon take a butt whooping as paint! So I hear you about that!! Oh by the way I worked for that contractor for 14 yrs.!
He told me that the next job required a lot of painting along with the remodel. So he looks at me and asks, "can you paint". I told him, well it was my favorite thing to do. He looks at me and his big booming and sometimes intimidating voice and says, "I didn't ask you your damn religion about it, can you paint"??? While sure I can. That is one of the few things I can do left handed. I can use a paint brush for cutting in work and I can run a skill saw left handed. However I would just about as soon take a butt whooping as paint! So I hear you about that!!
Oh by the way I worked for that contractor for 14 yrs.!
Jon Buescher
Well-Known Member
You can’t go in the shop this winter! It’ll be ice fishing and hunting season!
Jon Buescher
Well-Known Member
Porch did look beautiful by the way!
EdCaffreyMS
"The Montana Bladesmith"
I THOUGHT I was done, but yesterday, while Cindy was getting started on the door trim, she started showing me pictures on Pinterest of what she called "country screen doors"...... then I remembered that a couple of years ago we'd took a trip back east to Indiana/Kentucky..... and I brought back a whole trailer load of Oak, Walnut, Cherry, and Cedar lumber! Well, I gotta take care of my Sweetie, so today I dug through the pile, and found enough Red Oak to hopefully make her wish come true. Being that I'm in no way a carpenter.....just a farm boy who can envision things...... I got all the pieces cut out, and once Cindy got home from work....she was happily surprised.....and OKed it.
My plan is to leave it in "rough planed" condition on the faces, maybe give it a once over with some coarse sandpaper, then make up some "weathered" stain outta white vinegar and steel wool...... or who knows, Cindy might paint it.
My biggest issue is how to assemble all the pieces..... being a "hack" carpenter, my thought was deck/long drywall screws through the "edges" of the 1" boards, and into the adjacent piece(s)...... so that the holes/screws are as straight as possible...... I'm open to suggestions/tips/tricks. It's gotta look good for Cindy! My concern is drilling the holes straight so I don't punch a screw through the side of a board. (nothing in the pics is attached yet.....just pieces cut and laid in place.)

My plan is to leave it in "rough planed" condition on the faces, maybe give it a once over with some coarse sandpaper, then make up some "weathered" stain outta white vinegar and steel wool...... or who knows, Cindy might paint it.
My biggest issue is how to assemble all the pieces..... being a "hack" carpenter, my thought was deck/long drywall screws through the "edges" of the 1" boards, and into the adjacent piece(s)...... so that the holes/screws are as straight as possible...... I'm open to suggestions/tips/tricks. It's gotta look good for Cindy!
My concern is drilling the holes straight so I don't punch a screw through the side of a board. (nothing in the pics is attached yet.....just pieces cut and laid in place.)
C Craft
Well-Known Member
Ed, the three pieces that are horizontal to the door, the top middle and bottom pieces. Are they just cut to length, or did you do a tenon and mortise for them in the side rails???
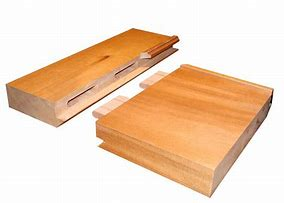 I have been trying to pull up a simple pic as too what I was speaking of and this is the best I can find. Disregard the fancy molding that you see in this pic and just use the principle of a tenon and a mortise!!
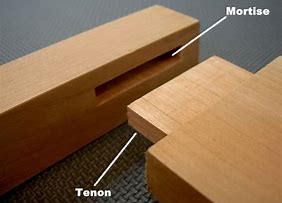 Here is a better pic of what I am speaking of the mortise is the pocket that would be cut in the side rail or the two vertical pieces of the door itself. The tenon would be cut on the three pieces that make up, the top middle and bottom piece of your door.
If you haven't done it that way you could drill two dowels thru into the horizontal pieces to make up a different kind of mortise tenon!! Here is a pic of what I am speaking of!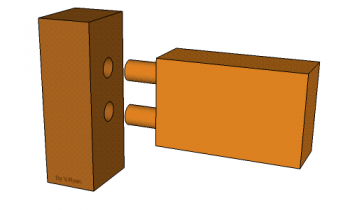 If you go that route, use a drill press to drill all the holes square and true. Glue the dowels both ends as well as the joint. Use only a wood glue that is rated for exterior use and don't be stingy with the glue. You will need to wipe off the excess of course after clamping before it dries with a wet rag. Water will change up the color of the Oak so you may need to wipe down the entire door!
The five pieces that will make up the bottom of the door should be put in with mortise and tenon as well. Gluing all that up at one time is fun and you will need a pile of bar clamps!!
Ed, I have a feeling you were not wanting to hear what I just said but with out tenon and mortise construction the door will self destruct itself no matter how you put screws in it. When that Montana wind slams the door, it will put a lot of strain on any of the joints. You can do the tenons on a table saw and the mortises can be done with a plunge router or a mortise drill. They have dedicated ones or you can buy an attachment for a drill press!!! Such as this It drill a hole and as the bit goes into the wood it cuts a square hole. Now you know why a country screen door can cost so much!! Hope all this explanation helps!!!
I have been trying to pull up a simple pic as too what I was speaking of and this is the best I can find. Disregard the fancy molding that you see in this pic and just use the principle of a tenon and a mortise!!Here is a better pic of what I am speaking of the mortise is the pocket that would be cut in the side rail or the two vertical pieces of the door itself. The tenon would be cut on the three pieces that make up, the top middle and bottom piece of your door. If you haven't done it that way you could drill two dowels thru into the horizontal pieces to make up a different kind of mortise tenon!! Here is a pic of what I am speaking of!
If you go that route, use a drill press to drill all the holes square and true. Glue the dowels both ends as well as the joint. Use only a wood glue that is rated for exterior use and don't be stingy with the glue. You will need to wipe off the excess of course after clamping before it dries with a wet rag. Water will change up the color of the Oak so you may need to wipe down the entire door! The five pieces that will make up the bottom of the door should be put in with mortise and tenon as well. Gluing all that up at one time is fun and you will need a pile of bar clamps!!
Ed, I have a feeling you were not wanting to hear what I just said but with out tenon and mortise construction the door will self destruct itself no matter how you put screws in it. When that Montana wind slams the door, it will put a lot of strain on any of the joints. You can do the tenons on a table saw and the mortises can be done with a plunge router or a mortise drill. They have dedicated ones or you can buy an attachment for a drill press!!! Such as this
It drill a hole and as the bit goes into the wood it cuts a square hole. Now you know why a country screen door can cost so much!! Hope all this explanation helps!!!
Von Gruff
KNIFE MAKER
If you are not comfortable doing hardwood dowel joints then you could drill a screw head sized hole half way through from the outside of the styles in the drill press (the upright sides of the door) and then use a long drill for a pilot hole through the rest of the depth and that will allow for a shorter screw to be turned into the end of the rails. This should aleviate the worry about misdirecting the screw.
EdCaffreyMS
"The Montana Bladesmith"
Thanks Guys! I haven't done any mortise work at all, everything is just "straight" cut right now. I might just combine both ideas...... hardwood dowels, and then a screw too! Guess I'll be making a Home Depot run this morning to gather things I need.
Another issue that I THINK I have figured out is the screen..... I think I'm gona copy another "screen" door we have.... the screen is held in with what I call rubber "piping"...... a slot with a round rubber "gasket" with the screen pressed in...... my thought is to run a shallow saw kerf, about 1/2" from the inside edges, all the way around...... and then use fiberglass screen.
I just realized...... I got myself into another project that's gona take a lot more time then I thought about....... story of my life.
Another issue that I THINK I have figured out is the screen..... I think I'm gona copy another "screen" door we have.... the screen is held in with what I call rubber "piping"...... a slot with a round rubber "gasket" with the screen pressed in...... my thought is to run a shallow saw kerf, about 1/2" from the inside edges, all the way around...... and then use fiberglass screen.
I just realized...... I got myself into another project that's gona take a lot more time then I thought about....... story of my life.

Daniel Macina
Well-Known Member
Maybe doing all this will buy you a week of uninterrupted shop time?! Hahahaha!

Chris Railey
Well-Known Member
I would rather slam my pinky toe in a sliding glass door than paint...

Smallshop
KNIFE MAKER
Lil wood glue wouldn't hurt either....Thanks Guys! I haven't done any mortise work at all, everything is just "straight" cut right now. I might just combine both ideas...... hardwood dowels, and then a screw too! Guess I'll be making a Home Depot run this morning to gather things I need.
Another issue that I THINK I have figured out is the screen..... I think I'm gona copy another "screen" door we have.... the screen is held in with what I call rubber "piping"...... a slot with a round rubber "gasket" with the screen pressed in...... my thought is to run a shallow saw kerf, about 1/2" from the inside edges, all the way around...... and then use fiberglass screen.
I just realized...... I got myself into another project that's gona take a lot more time then I thought about....... story of my life.
Jon Buescher
Well-Known Member
that would take some serious talentI would rather slam my pinky toe in a sliding glass door than paint...
EdCaffreyMS
"The Montana Bladesmith"
Got it all together! I went with dowels and counterbored 4" deck screws. Oak can be so time consuming to assemble.... every single hole must be drilled, both pilot and counterbore, then hope you don't twist a screw off when tightening....... but I got it!
Had to do a bit of research for what to finish it with..... was going to go with an oil finish, but since even in the best conditions, that needs redone every year in Montana..... I thought I'd consult the "experts" at a couple of our local paint stores. When I told them I wanted a clear/flat finish for Red Oak..... they looked at me like a deer in the headlights....so I turned to trusty google. Ended up buying a clear wood finish from Behr...... which carries a 4 year guarantee on vertical surfaces. Did some scrap testing, and really liked it, so side 1 of the door is not drying. I'll get more pics later.....but now it's "watching paint dry time"
Had to do a bit of research for what to finish it with..... was going to go with an oil finish, but since even in the best conditions, that needs redone every year in Montana..... I thought I'd consult the "experts" at a couple of our local paint stores. When I told them I wanted a clear/flat finish for Red Oak..... they looked at me like a deer in the headlights....so I turned to trusty google. Ended up buying a clear wood finish from Behr...... which carries a 4 year guarantee on vertical surfaces. Did some scrap testing, and really liked it, so side 1 of the door is not drying. I'll get more pics later.....but now it's "watching paint dry time"
Jon Buescher
Well-Known Member
Watching my Dad woodwork when I was a kid, when he was setting screws in hard wood he would wet the screw with a cheap liquid hand soap to lube it. It made quite the difference and is a cheap optionGot it all together! I went with dowels and counterbored 4" deck screws. Oak can be so time consuming to assemble.... every single hole must be drilled, both pilot and counterbore, then hope you don't twist a screw off when tightening....... but I got it!
Had to do a bit of research for what to finish it with..... was going to go with an oil finish, but since even in the best conditions, that needs redone every year in Montana..... I thought I'd consult the "experts" at a couple of our local paint stores. When I told them I wanted a clear/flat finish for Red Oak..... they looked at me like a deer in the headlights....so I turned to trusty google. Ended up buying a clear wood finish from Behr...... which carries a 4 year guarantee on vertical surfaces. Did some scrap testing, and really liked it, so side 1 of the door is not drying. I'll get more pics later.....but now it's "watching paint dry time"